Quicksort with Jenkins for Fun and No Profit
I first encountered Jenkins in 2007 while contributing to the Apache Nutch project. It was called Hudson back then. The nightly builds for the project ran on Hudson at that time. I remember sifting through my emails and reviewing build result notifications to keep an eye on the patches that got merged into the trunk everyday. Yes, patches and trunk! We were still using SVN back then.
Hudson was renamed to Jenkins in 2011. Since version 2.0 (released on 20 Apr 2016), Jenkins supports pipeline scripts written in Groovy as a first-class entity. A pipeline script effectively defines the build job. It can define build properties, build stages, build steps, etc. It can even invoke other build jobs, including itself.
Wait a minute! If a pipeline can invoke itself, can we, perhaps, solve a recursive problem with it? Absolutely! This is precisely what we are going to do in this post. We are going to implement quicksort as a Jenkins pipeline for fun and not a whit of profit!
Run Jenkins
Before we get started, I need to tell you how to set up Jenkins just enough to try the experiments presented later in this post on your local system. This could be useful if you have never used Jenkins before or if you do not have a Jenkins instance available with you right now. If you are already well-versed in Jenkins and have an instance at your disposal, feel free to skip ahead directly to the Quicksort section.
The steps below assume a Debian GNU/Linux system. However, it should be possible to do this on any operating system as long as you can run Docker containers. Since software evolves over time, let me note down the versions of software tools I am using while writing this post. Here they are:
- Debian GNU/Linux 12.4 (bookworm)
- Docker version 20.10.24+dfsg1, build 297e128
- Docker image tagged jenkins/jenkins:2.426.3-lts-jdk17
- Jenkins 2.426.3
We will perform only quick-and-dirty experiments in this post, so we do not need a production-grade Jenkins instance. We will run Jenkins temporarily in a container. The following steps show how to do this and how to configure Jenkins for the upcoming experiments:
-
Install Docker if it is not already present on the system. For example, on a Debian system, the following command installs Docker:
sudo apt-get install docker.io -
Now run the Jenkins container with this command:
sudo docker run --rm -p 8080:8080 jenkins/jenkins:lts -
When the container starts, it prints a password towards the bottom of the logs. Copy the password.
-
Visit http://localhost:8080/ in a web browser. When the Unlock Jenkins page appears, paste the password and click Continue.
-
On the Customize Jenkins page, click Install suggested plugins. Alternatively, to avoid installing unnecessary plugins, click Select plugins to install, deselect everything except Pipeline and click Install. We need the pipeline plugin to perform rest of the experiment laid out in this post.
-
On the Create First Admin User page, enter the details to create a new user.
-
On the Instance Configuration page, click Save and Finish.
-
The Jenkins is ready! page appears. Click Start using Jenkins.
-
Go to Build Executor Status > Built-In Node > Configure and change Number of executors from the default value of
2to10. Click Save.
Hello World
The following steps show how to run your first Jenkins pipeline:
-
Go to Dashboard > New Item. Enter an item name, say,
hello, select Pipeline and click OK. -
On the next page, scroll down to the Pipeline section at the bottom and paste the following pipeline script and click Save.
node { echo "hello, world" } -
Now click Build Now. A new build number appears at the bottom half of the left sidebar. Click on the build number, then click Console Output to see the output of the pipeline. The
hello, worldmessage should be present in the output.
To edit the pipeline script anytime, go to Dashboard, click on the pipeline, then go to Configure, scroll down to the Pipeline section, edit the script and click Save.
In real world software development, Jenkins is typically configured
to automatically pull some source code from a project repository
maintained under a version control system and then build it using
the pipeline script found in the file named Jenkinsfile
present at the top-level directory of the project. But since we
only intend to perform fun experiments in this post, we will just
paste our pipeline script directly into the pipeline configuration
page on Jenkins as explained above in order to keep things simple.
Jenkins also supports another way of writing pipelines using a
declarative style. They are known as declarative
pipelines. In this post, however, we will write
only scripted pipelines so that we can write simple Groovy
code for our experiments without having to bother about too many
pipeline-specific notions like stages, steps, etc.
Factorial
Now let us write a simple pipeline that calculates the factorial of a nonnegative integer. This will help us to demonstrate how a build job can recursively call itself. We are not going to write something like the following:
properties([
    parameters([
        string(
            name: 'INPUT',
            defaultValue: '0',
            description: 'A nonnegative integer'
        )
    ])
])

def factorial(n) {
    return n == 0 ? 1 : n * factorial(n - 1)
}

node {
    echo "${factorial(params.INPUT as int)}"
}
The code above is an example of a function that calls itself recursively. However, we want the build job (not the function) to call itself recursively. So we write the following instead:
properties([
    parameters([
        string(
            name: 'INPUT',
            defaultValue: '0',
            description: 'A nonnegative integer'
        )
    ])
])

def MAX_INPUT = 10

node {
    echo "INPUT: ${params.INPUT}"
    currentBuild.description = "${params.INPUT} -> ..."

    def n = params.INPUT as int
    if (n > MAX_INPUT) {
        echo "ERROR: Input must not be greater than ${MAX_INPUT}"
    }

    env.RESULT = n == 0 ? 1 : n * (
        build(
            job: env.JOB_NAME,
            parameters: [string(name: 'INPUT', value: "${n - 1}")]
        ).getBuildVariables().RESULT as int
    )

    echo "RESULT: ${env.RESULT}"
    currentBuild.description = "${params.INPUT} -> ${env.RESULT}"
}
This code example demonstrates a few things worth noting:
-
The
propertiesstep at the top sets up a build parameter namedINPUTwith a default value of0. This will allow us to enter an input number while building the job. -
Within the
nodeblock, we first check that the input is not too large. If the input number is larger than 10, the pipeline refuses to run. This is just a tiny safety check to prevent the overzealous among you from inadvertently causing havoc in your Jenkins instance by triggering a job with a large input and depleting all the executors with an excess of recursive jobs. -
Then we perform the classic recursion to compute the factorial of a given nonnegative integer. The only thing that may appear unusual here is that instead of just writing
factorial(n -
      1)
, we make abuild()call to invoke the job itself recursively and passn - 1as a build parameter input to that job. -
Each recursively called job writes its output to an environment variable named
RESULTand exits. Then the higher-level job invocation looks up the environment variables in the build result of the job that just finished with thegetBuildVariables()call, reads theRESULTvariable and multiplies the value found there byn. -
The lines that update
currentBuild.descriptionare there only to show handy descriptions of what is going on (the input and the result) in the build history that appears on the left sidebar. A screenshot presented later illustrates this.
To run the above pipeline, perform the following steps on the Jenkins instance:
-
Go to Dashboard > New Item. Enter an item name, say,
factorial, select Pipeline and click OK. -
On the next page, scroll down to the Pipeline section at the bottom and paste the pipeline script presented above.
-
Click Build Now. The first build sets the
INPUTbuild parameter to0(the default value specified in the pipeline script). The result1shoud appear in the Console Output page. -
After the first build completes, the Build Now option on
the left sidebar gets replaced with the Build with
Parameters option. Click it, then enter a number,
say,
5and click Build. Now we should see Jenkins recursively triggering a total of 6 build jobs and each build job printing the factorial of the integer it receives as input. The top-level build job prints120as its result.
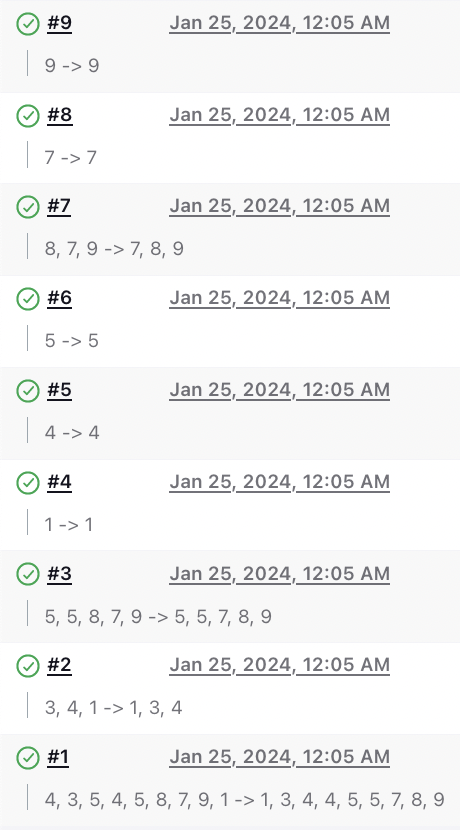
Here is a screenshot that shows what the build history looks like on the left sidebar:

In the screenshot above, build number 2 is the build we triggered to
compute the factorial of 5. This build resulted in recursively
triggering five more builds which we see as build numbers 3 to 7.
The little input and output numbers displayed below each build
number comes from the currentBuild.description value we
set in the pipeline script.
If we click on build number 7, we find this on the build page:
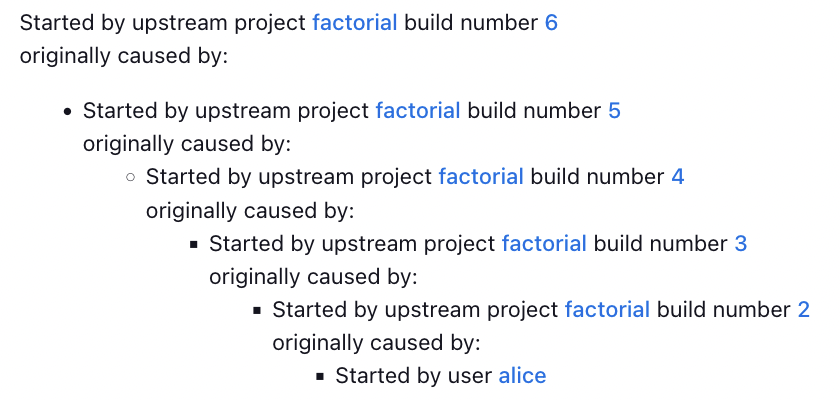
This was a simple pipeline that demonstrates how a build job can trigger itself, pass input to the triggered build and retrieve its output. We did not do much error checking or error handling here. We have kept the code as simple as reasonably possible. The focus here was only on demonstrating the recursion.
Quicksort
Now we will implement quicksort in Jenkins. Sorting numbers using the standard library is quite straightforward in Groovy. Here is an example in the form of Jenkins pipeline:
properties([
    parameters([
        string(
            name: 'INPUT',
            defaultValue: '4, 3, 5, 4, 5, 8, 7, 9, 1',
            description: 'Comma-separated list of integers'
        )
    ])
])

node {
    def numbers = params.INPUT.split('\\s*,\\s*').collect {it as int}
    echo "${numbers.sort()}"
}
It can't get simpler than this. However, we are not here to demonstrate the standard library methods. We are here to demonstrate recursion in Jenkins! We write the following pipeline script instead:
properties([
    parameters([
        string(
            name: 'INPUT',
            defaultValue: '4, 3, 5, 4, 5, 8, 7, 9, 1',
            description: 'Comma-separated list of integers'
        )
    ])
])

def MAX_INPUT_SIZE = 10

node {
    echo "INPUT: ${params.INPUT}"
    currentBuild.description = "${params.INPUT} -> ..."

    def numbers = params.INPUT.split('\\s*,\\s*').collect {it as int}
    if (numbers.size() > MAX_INPUT_SIZE) {
        echo "ERROR: Input must not contain more than ${MAX_INPUT_SIZE} integers"
    }

    def pivot = numbers[0]
    def others = numbers.drop(1)
    def lo = others.findAll { it <= pivot }
    def hi = others.findAll { it > pivot }
    def builds = [:]
    def results = [lo: [], hi: []]

    if (lo) {
        builds.lo = {
            results.lo = build(
                job: env.JOB_NAME,
                parameters: [string(name: 'INPUT', value: lo.join(', '))
            ]).getBuildVariables().RESULT.split('\\s*,\\s*') as List
        }
    }
    if (hi) {
        builds.hi = {
            results.hi = build(
                job: env.JOB_NAME,
                parameters: [string(name: 'INPUT', value: hi.join(', '))
            ]).getBuildVariables().RESULT.split('\\s*,\\s*') as List
        }
    }
    parallel builds

    env.RESULT = (results.lo + [pivot] + results.hi).join(', ')
    echo "RESULT: ${env.RESULT}"
    currentBuild.description = "${params.INPUT} -> ${env.RESULT}"
}
Some of the code is similar to the one in the previous section. For
example, the properties step to set up the build
parameter, the build() call, setting the result
in env.RESULT, etc. should look familiar. Let us pay
attention to what is different.
Firstly, we have two build() calls instead of just one.
In fact, we have two closures with one build() call in
each closure. Then we use the parallel step to execute
both these closures in parallel. In each build job, we pick the
first integer in the input as the pivot, then compare all the
remaining integers with this pivot and separate them
into lo (low numbers) and hi (high
numbers). Then we call the build job recursively to repeat this
algorithm twice: once on the low numbers and again on the high
numbers.
Unlike most textbook implementations of quicksort which lets the recursion run all the way to the base case in which an empty list is received and the recursive call returns without doing anything, the above implementation is slightly optimised to avoid making recursive builds when we find that the list of low numbers or the list of high numbers is empty. We lose a little bit of simplicity by doing this but it helps in avoiding wasteful build jobs that just receive an empty list of numbers as input and exit without doing anything meaningful. Further optimisation could involve avoiding recursion for small input sizes, such as 1 or 2, but that is not done here for the sake of simplicity and brevity.
I hope this was fun!